

一,NSCAssert,断言。传递表达式,如果返回假值,则抛出异常,输出自定义描述。
例如:
- (void)drawRect:(CGRect)rect {
      NSCAssert(!CGRectIntersectsRect(rect, CGRectZero), @"坐标不是0");
}
//抛出异常并处暑:
2020-11-19 16:37:18.590249+0800 xxxxxDemo[32712:1866711] *** Terminating app due to uncaught exception 'NSInternalInconsistencyException', reason: '坐标不是0'
2,Xcode instrument内存工具。
Leaks,检测运行时内存是否泄漏;
Allocation,检测对象,消息的内存分配情况;
Activity Monitor,CPU ,内存使用详情查看;
NetWork,检测上传,下载的数据流量。
三,控制台查看swift版本:
swift -version
Apple Swift version 5.3 (swiftlang-1200.0.29.2 clang-1200.0.30.1)
Target: x86_64-apple-darwin19.6.0
四,模块分离思想。
案例,例如微信通讯录列表页,首先,此模块在通讯录模块进行展示,然后如果有第三方分享进入微信,需要模态出当前页面通讯录模块,然后点击某一个好友分享给他。
那么如果一个团队是协同开发,有好多其他模块需要用到此模块,并且其他模块的数据跟此模块中的数据不同,但是为了单独分离出来此模块,让其他开发人员可通过开放接口去调用并且赋值此模块数据,就需要进行模块分离。
只是一个简单的思想,可通过不同的业务进行分离。
首先,当前通讯录View是一个tableview,cell都是同一个cell,例如当前cell中的数据是image,name,age,那么其他开发人员的数据可能是imageVlue,nameVlue,ageValue,但是不可能让其他人员在自己cell配置数据的时候,将自己的model传递过来,重新写一个分配方法,所以需要自定义一个公用的model,PublicModel吧,然后整个cell的数据分配就用PublicModel去分配,其他人传递过来的数据只需要转换成PublicModel即可,然后在cell的点击方法里边将PublicModel传递出去做后续的操作。例如:
    PublicModel *pModel = [[PublicModel alloc]init];
    pModel.name = otherModel.nameValue;
    pModel.age = otherModel.ageValue;
    ......
    //
    [cell settingContentModel:pModel];
模块分离一般适用于公用的业务层,例如登陆,公共的视图显示等。
四,面向切面编程。
iOS中实现AOP的核心技术是Runtime,使用Runtime的Method Swizzling黑魔法。
Method Swizzling比较简单的第三方库有,Aspects。
https://github.com/steipete/Aspects
内部实现原理,通过获取对象或者类对象,再获取selector,将当前类里的selector进行交换,在交换的同事,会分先后进行调用block,告诉外部block的操作,block一般都是日志的记录和上报。例如:
    [UIViewController aspect_hookSelector:@selector(viewWillAppear:) withOptions:AspectPositionAfter usingBlock:^(id<AspectInfo> aspectInfo, BOOL animated) {
        NSLog(@"View Controller %@ will appear animated: %tu", aspectInfo.instance, animated);
    } error:NULL];
获取了UIViewController为类对象,又获取了viewWillAppear方法,然后内部通过method_exchangeImplementations魔法方法进行交换,被交换的方法是viewWillAppear,交换的方法是内部自定义的方法,例如:
- (void)xxx_viewWillAppear:(BOOL)animated {
    [self xxx_viewWillAppear:animated];
    NSLog(@"viewWillAppear: %@", self);
    if(self.block) self.block(params);
}
当外部调用viewWillAppear的时候,其实在之前已经将xxx_viewWillAppear方法和其进行了交换,所以内部走了xxx_viewWillAppear方法, 然后xxx_viewWillAppear方法已经和viewWillAppear进行了交换,xxx_viewWillAppear方法内部又调用了xxx_viewWillAppear方法, 其实是调用了viewWillAppear方法,然后将block返回,让外部去进行操作。
面向切片,可以不在其类的内部进行操作,让系统底层将业务逻辑部分进行分离,不影响和改变其正常业务逻辑的代码。
面向切片变成主要用于:日志记录,性能统计,安全控制,事务处理,异常处理。
其实原理就是将其事务在内部进行拦截,然后进行了处理,然后再执行该事务。例如数组越界导致崩溃,可以用此形式进行拦截判断。具体看http://www.iashes.com/2020/11/28-716.html 第八项。
简单用消息转发机制实现的一个hook示例:
@interface HookProxy : NSProxy
+ (instancetype)HookProxyWithTarget:(id)target;
- (void)HookWithSelector:(SEL)selector HookBlock:(void(^)(NSString *desc))hookBlock;
@end
//
#import "HookProxy.h"
@interface HookProxy()
@property (nonatomic,copy)void(^hookBlock)(NSString *desc);
@property (nonatomic,strong)id target;
@property (nonatomic,assign)SEL selector;
@end
@implementation HookProxy

+ (instancetype)HookProxyWithTarget:(id)target;
{
    HookProxy *proxy = [HookProxy alloc];
    if(target) proxy.target = target;
    return proxy;
}
- (void)HookWithSelector:(SEL)selector HookBlock:(void(^)(NSString *desc))hookBlock
{
    if(hookBlock) self.hookBlock = hookBlock;
    if(selector) self.selector = selector;
    [self performSelector:self.selector];
}
- (NSMethodSignature *)methodSignatureForSelector:(SEL)sel
{
    //注册到target中,去接受当前的消息(执行当前的方法)
    return [self.target methodSignatureForSelector:sel];
}
- (void)forwardInvocation:(NSInvocation *)invocation
{
    //唤醒target接受消息
    if(self.hookBlock) self.hookBlock(invocation.description);
    [invocation invokeWithTarget:self.target];
}
//使用:
- (void)viewDidLoad {
    [super viewDidLoad];
    HookProxy *hookProxy = [HookProxy HookProxyWithTarget:self];
    [hookProxy HookWithSelector:@selector(testHook) HookBlock:^(NSString * _Nonnull desc) {
        NSLog(@"%@",desc);
    }];
}
- (void)testHook
{
    NSLog(@"This is hook Simulation!");
}
五,关联对象。
objc_setAssociatedObject(<#id _Nonnull object#>, <#const void * _Nonnull key#>, <#id _Nullable value#>, <#objc_AssociationPolicy policy#>)
四个参数:
1,要关联的类;
2,关联标识符,可通过当前key找到被关联的对象,一一对应关系;
3,被关联的对象;
4,关联策略,也就是当前被关联对象修饰符类型,策略有,
OBJC_ASSOCIATION_RETAIN_NONATOMIC ,类似于(nonatomic, strong);
OBJC_ASSOCIATION_COPY_NONATOMIC,类似于(nonatomic, copy);
OBJC_ASSOCIATION_RETAIN,类似于(atomic, strong);
OBJC_ASSOCIATION_COPY,类似于(nonatomic, copy);
示例:
@interface UIButton (Block)
- (void)eventWithBlock:(void(^)(id sender))block;
@end
//
#import "UIButton+Block.h"
#import <objc/runtime.h>

@implementation UIButton (Block)
- (void)eventWithBlock:(void(^)(id sender))block
{
    if(block){
        //等同于自动为当前button绑定了一个成员变量,也就是block
        objc_setAssociatedObject(self, @selector(btnAction:), block, OBJC_ASSOCIATION_COPY_NONATOMIC);
    }
    [self addTarget:self action:@selector(btnAction:) forControlEvents:UIControlEventTouchUpInside];
}

- (void)btnAction:(id)sender
{
    //获取当前block
    void(^btBlock)(id sender) =  objc_getAssociatedObject(self, _cmd);
    if(btBlock) btBlock(sender);
}

@end
//使用:
    UIButton *button = [[UIButton alloc]initWithFrame:CGRectMake(20, 100, 70, 70)];
    button.backgroundColor = [UIColor orangeColor];
    [button eventWithBlock:^(id  _Nonnull sender) {
        NSLog(@"%@",[sender description]);
    }];
    [self.view addSubview:button];
objc_getAssociatedObject,通过key获取当类的关联对象,key也就是objc_setAssociatedObject中定义的key。
在objc_setAssociatedObject中,直接用selector作为key,所以在selector内部获取关联对象时直接用_cmd可直接得到key,然后获取关联对象,也可以这么操作:
//关联
objc_setAssociatedObject(self, "this is button block key", block, OBJC_ASSOCIATION_COPY_NONATOMIC);
//获取
void(^btBlock)(id sender) =  objc_getAssociatedObject(self, "this is button block key");
//这里的key必须是一一对应的,才能够找到关联的对象。类似于map中的valueForKey:。
5,debug和release期间的代码调试。
#ifdef DEBUG
    NSLog(@"debug");//debug时候运行
#else
    NSLog(@"release");//上线时候运行
#endif
七,__sync_synchronize();此函数让上下代码顺序执行,会阻碍当前线程。
八,class_addMethod。
此方法判断当前绑定的类中是否实现了某个SEL,如果没有实现,则返回True,实现了则返回False。
参数:
1,对应查询的类(目标类);
2,被查询的SEL;
3,如果没有实现SEL,那么传递的当前要添加新的IMP去实现SEL;
4,替换的IMP一些信息,返回值和参数等。
如果返回True,说明SEL在当前类没有,那么参数3中IMP会添加到当前类。
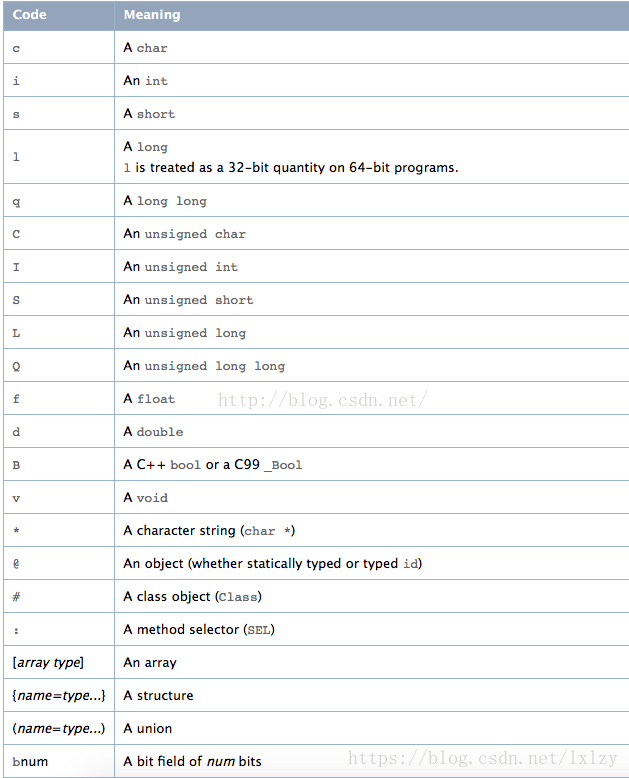
参数信息是一个char类型的指针,”v@:@”,v标示当前添加的新方法无返回值,@标示返回的对象类型,具体如下图:
method_getTypeEncoding可以获取另外一个method的参数及返回值。
    SEL runSelector = @selector(run);
    //更换成
    SEL runs_Selector = @selector(runs);
    Method runs_Method = class_getInstanceMethod(self.class, runs_Selector);
    bool addMethod = class_addMethod(self.class, runSelector, method_getImplementation(runs_Method), method_getTypeEncoding(runs_Method));
class_replaceMethod,将方法进行了替换,其内部执行了两个方法,class_addMethod和method_exchangeImplementations方法,class_addMethod绑定其方法,method_exchangeImplementations进行方法交换。
class_replaceMethod(Class cls, SEL, imp, types);
四个参数:
1,目标类;
2,被替换的方法SEL(旧);
3,替换的方法IMP,(新);
4,替换的方法信息(新),返回值和参数等;
如下示例:
    SEL runSelector = @selector(run);
    //更换成
    SEL runs_Selector = @selector(runs);
    Method runs_Method = class_getInstanceMethod(self.class, runs_Selector);
//    bool addMethod = class_addMethod(self.class, runSelector, method_getImplementation(runs_Method), method_getTypeEncoding(runs_Method));
    class_replaceMethod(self.class, runSelector, method_getImplementation(runs_Method), method_getTypeEncoding(runs_Method));
    objc_msgSend(self,@selector(run));
//
- (void)run
{
    NSLog(@"run");
}
- (void)runs
{
    NSLog(@"runs_Selector");
}
//输出
2020-12-07 22:51:35.200855+0800 demo[9703:8295268] runs_Selector
九,两个子线程,让第一个线程等待第二个线程执行完再去执行第一个线程里的任务。
    //让第一个线程等待第二个线程执行完再去执行,创建当前信号数量为0
    dispatch_semaphore_t dsema = dispatch_semaphore_create(0);
    [NSThread detachNewThreadWithBlock:^{
        //等待其信号为1的时候,执行wait后的操作,wait执行完之后,信号量变为0
        dispatch_semaphore_wait(dsema, DISPATCH_TIME_FOREVER);
        NSLog(@"1-%@",[NSThread currentThread].description);
    }];
    [NSThread detachNewThreadWithBlock:^{
        NSLog(@"2-%@",[NSThread currentThread].description);
        sleep(2);
        //发送信号,信号量变为1,然后等待线程才去执行。
        dispatch_semaphore_signal(dsema);
    }];
信号量也是一种锁,所以可以让其消息内部只能有一个线程进行操作,例如:
{
    dispatch_semaphore_t _dsema;//成员变量
}
//
- (void)runSemaphoreTextWithInt:(NSInteger)value
{
    //让其内部只能有一个线程对其进行操作,
    //执行完wait后,信号-1变为0,其他线程进来之后会进行等待,直到信号量大于0
    dispatch_semaphore_wait(_dsema, DISPATCH_TIME_FOREVER);
    NSLog(@"Semaphore - %ld",value);
    sleep(2);
    //发送一个信号,说明当前任务已经执行完,信号量+1
    dispatch_semaphore_signal(_dsema);
}
//
- (void)viewDidLoad {
    [super viewDidLoad];
    //创建当前信号为1
    _dsema = dispatch_semaphore_create(1);
//
    dispatch_queue_global_t global = dispatch_get_global_queue(DISPATCH_QUEUE_PRIORITY_DEFAULT, 0);
    for (NSInteger i = 1; i <= 100; i++) {
        dispatch_async(global, ^{
            [self runSemaphoreTextWithInt:i];
        });
    }
}
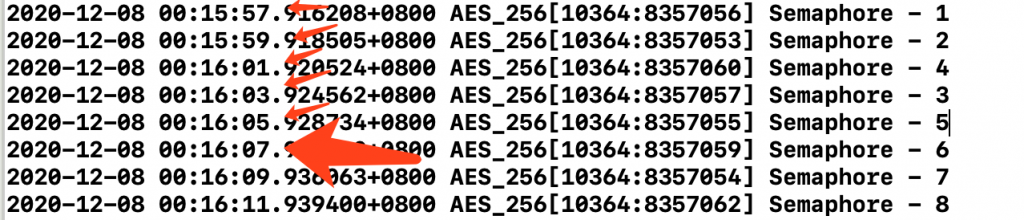
输出的数据,间隔都是两秒
十,数据缓存工具,如果读写任务有加锁操作,为什么要写成单例?
首先,数据缓存时,为了数据安全和完整性,所以写数据是必须要进行加锁,保证当前任务只有一个线程进行写操作,多个线程操作会导致数据丢失或者不完整。
要保证对”写任务”进行加锁,必须是同一队列。试想一下,如果不是同一队列,只是在一个子线程中对其进行了加锁,那么外部多个地方调用了”写任务”,其他地方也会进入写操作,数据也是不完整的,例如:
其他任务进入writeOperateWithData方法后,会重新创建子线程,例如第一个创建的线程number为1,第二个为2,那么pthread加锁的分别是1和2,并不是同一个线程任务,所以多个地方调用,会造成多个线程同事操作”写任务”。
- (void)writeOperateWithData:(NSData *)data
{
    [NSThread detachNewThreadWithBlock:^{
        pthread_rwlock_wrlock(&_lock);
        //write operate...
        NSLog(@"%s",__func__);
        pthread_rwlock_unlock(&_lock);
    }];
}
那么如果换成以下操作,会如何:
- (void)writeOperateWithData:(NSData *)data
{
    pthread_rwlock_wrlock(&_lock);
    [NSThread detachNewThreadWithBlock:^{
        //write operate...
        NSLog(@"%s",__func__);
    }];
    pthread_rwlock_unlock(&_lock);
}
这样是可以实现当前写任务,保证其只有一个线程对写任务进行操作,但是弊端就是,会阻碍当前NSThread以外的线程。
那么如果将写任务换成GCD队列进行操作会如何?
- (void)writeOperateWithData:(NSData *)data
{
    //async会创建一个新的线程
    dispatch_async(_sCacheQueue, ^{
        //加锁
        pthread_rwlock_wrlock(&_lock);
        //write operate...
        //解锁
        pthread_rwlock_unlock(&_lock);
    });
}
以上也会创建一个新的线程,也会对新的线程进行加锁,但是每次运行writeOperateWithData方法, 都会创建一个新的线程,(或许也不会创建新的,因为GCD按照内核和网络的分布,最大好像能够创建4-5个线程),那么pthread只会为当前任务进行加锁,也就是说下次再调用写方法,如果再次创建一个新线程,跟之前创建的没有关系,做不到写任务安全。如果在异步任务外部加锁,跟NSThread中类似,会阻碍外部线程。
所以具体实现方式,利用栅栏函数进行加锁比较靠谱:
{
    dispatch_queue_t _sCacheQueue;
}
//
- (instancetype)init
{
    self = [super init];
    if(self){
        _sCacheQueue = dispatch_queue_create("com.iashes.sqliteCache", DISPATCH_QUEUE_CONCURRENT);
    }
    return self;
}
//
- (void)writeOperateWithData:(NSData *)data
{
    //_sCacheQueue队列中调用栅栏函数
    dispatch_barrier_async(_sCacheQueue, ^{
        //write operate...
    });
}
dispatch_barrier_async,栅栏函数能够对当前队列中的任务进行分割,如果当前任务在栅栏函数任务之前,那么栅栏函数会等待其执行完再去执行,如果栅栏函数在其他任务之前那么先执行栅栏函数,然后执行其他任务,不管其他任务是并发还是非并发。
说白了,栅栏函数可以对当前队列中的任务进行一个加锁,并且不会阻碍其加锁线程以外的其他线程。
以上_sCacheQueue队列是在单例里边,如果写操作也是通过当前队列中的任务去操作,那么如果同时调用读写,那么按照顺序,栅栏函数会在之前或者之后执行,不会同时执行。
dispatch_barrier_async任务在子线程中执行;
dispatch_barrier_sync任务在主线程中执行。
那么归到原题,缓存中如果有多读单写的任务,为什么要写成单例?
首先反转一下, 如果不写成单例,那么每次创建的对象不同,那么队列(也就是当前对象里边的成员列表队列)也不同,所以如果有多个地方调用此实例的写方法,那么会导致栅栏函数只会对当前队列任务进行加锁。
例如第一次创建obj,会有一个_sCacheQueue,然后又创建了一个obj_2,那么也会有新的_sCacheQueue,所以当前栅栏函数只针对每个obj中的_sCacheQueue队列中的任务进行加锁。并不会让其队列中的所有任务进行同步。
所以具体实现为:
@interface SqliteCacheManager : NSObject
+ (instancetype)defaultManager;
@end
//
#import "SqliteCacheManager.h"

@interface SqliteCacheManager()
{
    dispatch_queue_t _sCacheQueue;
}
@end
@implementation SqliteCacheManager
- (instancetype)init
{
    self = [super init];
    if(self){
        //并发队列
        _sCacheQueue = dispatch_queue_create("com.iashes.sqliteCache", DISPATCH_QUEUE_CONCURRENT);
    }
    return self;
}
+ (instancetype)defaultManager
{
    static dispatch_once_t onceQueue;
    static SqliteCacheManager *cacheManager = nil;
    dispatch_once(&onceQueue, ^{
        cacheManager = [[self alloc] init];
    });
    return cacheManager;
}
- (void)writeOperateWithData:(NSData *)data
{
    //_sCacheQueue队列中调用栅栏函数,这里是异步
    dispatch_barrier_async(_sCacheQueue, ^{
        //write operate...
    });
}
- (void)readOperateWithPath:(NSString *)path
{
    //异步任务读取。
    dispatch_async(_sCacheQueue, ^{
        //read operate...
    });
}

@end
//这里读写会按照顺序进行操作,因为栅栏函数将队列中的任务进行了分割。
//dispatch_barrier_async在前先执行_sCacheQueue中的此任务,如果dispatch_barrier_async在后,后执行_sCacheQueue中的此任务。保证其线程同步,
延展,栅栏函数可以充当队列组group中的notify去使用,例如:
    dispatch_queue_t queue = dispatch_queue_create("com.iashes.testQueue", DISPATCH_QUEUE_CONCURRENT);
    for (NSInteger i = 0; i < 3; i++) {
        dispatch_async(queue, ^{
            NSLog(@"0 - %@ - 同步栅栏,不创建子线程,只是在当前线程中执行",[NSThread currentThread].description);
            //这里可以去请求图片
        });
    }
    //同步栅栏,不创建子线程,只是在当前线程中执行,
    dispatch_barrier_sync(queue, ^{
        //这里可以去刷新view,这里自身就是当前线程,也就是主线程
        NSLog(@"1 - %@ - 这里可以去刷新view,这里自身就是当前线程,也就是主线程",[NSThread currentThread].description);
    });
//输出
2020-12-08 22:43:56.373411+0800 xxxx[12979:8606802] 0 - <NSThread: 0x600001ab10c0>{number = 3, name = (null)} - 同步栅栏,不创建子线程,只是在当前线程中执行
2020-12-08 22:43:56.373473+0800 xxxx[12979:8606802] 0 - <NSThread: 0x600001acdb40>{number = 6, name = (null)} - 同步栅栏,不创建子线程,只是在当前线程中执行
2020-12-08 22:43:56.373497+0800 xxxx[12979:8606801] 0 - <NSThread: 0x600001ab5b00>{number = 2, name = (null)} - 同步栅栏,不创建子线程,只是在当前线程中执行
2020-12-08 22:43:56.373946+0800 xxxx[12979:8606704] 1 - <NSThread: 0x600001afc080>{number = 1, name = main} - 这里可以去刷新view,这里自身就是当前线程,也就是主线程
    [NSThread detachNewThreadWithBlock:^{
        NSLog(@"ns - %@",[NSThread currentThread]);
        dispatch_barrier_sync(queue, ^{
            NSLog(@"br - %@",[NSThread currentThread]);
        });
    }];
//但是这样的话,dispatch_barrier_sync任务就不是主线程任务,它其实就是与dispatch_barrier_sync外层的线程进行同步任务,外层是什么线程,这里的任务就是在哪个线程执行。
读写锁:
//读
pthread_rwlock_rdlock(&_lock);
pthread_rwlock_unlock(&_lock);
//写
pthread_rwlock_wrlock(&_lock);
pthread_rwlock_unlock(&_lock);
十一,宏定义区分模拟器还是设备。
#if TARGET_IPHONE_SIMULATOR
    NSLog(@"run on simulator");
#else
    NSLog(@"run on device");
#endif
十二,读取string文件。
NSString *str = NSLocalizedStringFromTable(@”skyzizhuTextByTest”, @”File”, @””);
十三,设置动画事物,等待动画结束执行block。
    CALayer *layer = [[CALayer alloc]init];
    layer.bounds = CGRectMake(0, 0, 100, 100);
    layer.position = CGPointMake(120, 400);
    layer.backgroundColor = [UIColor greenColor].CGColor;
    [self.view.layer addSublayer:layer];
    self.layer = layer;
    //
    //设置变化动画过程是否显示,默认为YES不显示
    [CATransaction setValue:(id)kCFBooleanFalse forKey:kCATransactionDisableActions];
    [CATransaction setValue:[NSNumber numberWithFloat:1.0f]forKey:kCATransactionAnimationDuration];
    [CATransaction setCompletionBlock:^{
        //下边事务中的动画执行结束后,执行此block。
        NSLog(@"执行完了");
    }];
    [CATransaction begin];//事务开始
      //设置圆角会有动画过程
    self.layer.cornerRadius = (self.layer.cornerRadius == 0.0f) ? 30.0f : 0.0f;
      //设置透明度会有动画过程
    self.layer.opacity = (self.layer.opacity == 1.0f) ? 0.5f : 1.0f;
    [CATransaction commit];//事务结束
可通过CATransaction为button等控件做一些点击动画效果等。
十四,通过block执行其任务,发现一个好处,主要是思想。
首先一个controller里边定义了一个block类型的属性。
controller的viewDidDisappear方法中,去执行一个方法,但是为了保证当前是被pop或者dismiss掉的,也就是move掉,因为viewDidDisappear方法的执行不仅仅是在当前页面pop或者dismiss的时候,或许是其他页面push进来。
所以用了一个全局的block在当前方法中执行,为了保证当前方法执行完,可以执行dealloc方法,这样就可以置空了block,具体查询SkyQRCodeController类。
也就是说,self可以控制当前block的生命周期。但是如果是-method,那么就不行了。
十五,Masonry优先级,将某一个约束的约束级别进行调整。可通过设置优先级,修复自动布局中的冲突布局。
[self.contentBgView mas_updateConstraints:^(MASConstraintMaker *make) {
    CGFloat height = is ? ScaleForSize(408.0) : ScaleForSize(324.0);
    make.height.mas_equalTo(height).priorityHigh();
}];
分别有:
priorityLow,priorityMedium,priorityHigh三个级别。
十六,UICollectionView获取当前显示内容的大小区域,可根据当前区域调节UICollectionView的大小。
collectionView.collectionViewLayout.collectionViewContentSize。
十七,intrinsicContentSize.height
参考:http://www.iashes.com/2021/02/02-1197.html
十八,masonry设置内边距:
[paddingView mas_makeConstraints:^(MASConstraintMaker *make) {
    make.edges.equalTo(fistView).insets(UIEdgeInsetsMake(5, 5, 5, 5));
}];
十九,定时器模拟暂停和开始:
//暂停计时器
[weakSelf.timer setFireDate:[NSDate distantFuture]];
//立马执行
[weakSelf.timer setFireDate:[NSDate date]];
二十,为某个view添加标识:
view.accessibilityIdentifier = @””;
二十一,获取当前字符串的高度,并且换取固定行数字符串的高度,以下为2行。
- (CGFloat)getTextHeight:(NSString *)text width:(CGFloat)width fontSize:(CGFloat)fontSize
{
    if(text.length <= 0) return 0.0;
    CGSize newSize = [text boundingRectWithSize:CGSizeMake(width, MAXFLOAT) options:NSStringDrawingUsesLineFragmentOrigin attributes:@{NSFontAttributeName:BoleFontSize(fontSize)} context:nil].size;
    CGSize size = [@"*\n*" sizeWithAttributes: @{
                      NSFontAttributeName: BoleFontSize(fontSize)
                  }];
    if(newSize.height >= size.height) return size.height;
    return newSize.height;
}
二十二,系统选取相册模态上来之后,视图有向上偏移,解决办法为:
UIScrollViewContentInsetAdjustmentAutomatic
    if (@available(iOS 11, *)) {
            UIScrollView.appearance.contentInsetAdjustmentBehavior = UIScrollViewContentInsetAdjustmentAutomatic;
    }
    UIImagePickerController *ipc = [[UIImagePickerController alloc] init];
    ipc.sourceType = UIImagePickerControllerSourceTypeSavedPhotosAlbum;
    ipc.modalPresentationStyle = UIModalPresentationFullScreen;
    ipc.delegate = self;
    ipc.allowsEditing = YES;
    [self presentViewController:ipc animated:YES completion:^{
        UIScrollView.appearance.contentInsetAdjustmentBehavior = UIScrollViewContentInsetAdjustmentNever;
    }];
二十三,设置view的圆角4个值都不同:
#import "UIView+Radius.h"
- (void)setCornerRadiusLeftTop:(CGFloat)leftTop rightTop:(CGFloat)rightTop leftBottom:(CGFloat)leftBottom rightBottom:(CGFloat)rightBottom
{
    CGFloat width = self.bounds.size.width;
    CGFloat height = self.bounds.size.height;
    UIBezierPath *path = [UIBezierPath bezierPath];
    [path moveToPoint:CGPointMake(0.0, leftTop)];
    [path addQuadCurveToPoint:CGPointMake(leftTop, 0.0) controlPoint:CGPointZero];
    [path addLineToPoint:CGPointMake(width - rightTop, 0.0)];
    [path addQuadCurveToPoint:CGPointMake(width, rightTop) controlPoint:CGPointMake(width, 0.0)];
    [path addLineToPoint:CGPointMake(width, height - rightBottom)];
    [path addQuadCurveToPoint:CGPointMake(width - rightBottom, height) controlPoint:CGPointMake(width, height)];
    [path addLineToPoint:CGPointMake(leftBottom, height)];
    [path addQuadCurveToPoint:CGPointMake(0.0, height - leftBottom) controlPoint:CGPointMake(0.0, height)];
    [path closePath];
    //
    CAShapeLayer *maskLayer = [CAShapeLayer layer];
    maskLayer.frame = self.bounds;
    maskLayer.path = path.CGPath;
    self.layer.mask = maskLayer;
}